Having Julie on board was fantastic! We did two looks, one with a vibrant turquoise nail color paired with long nails. We kept the look rather simple on that look with clean skin, no liner (just a few false individual lashes thrown in for a slightly more "oomphed" natural eye), groomed brows and no blush. Just a little contour powder and gloss topped off with slicked back hair. I think it turned out rather well with the nails and the lips stealing the scene.
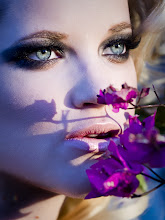
The second look was pretty much the opposite. Jule trimmed the nails and gave them an "inverted half moon" shape topped with a shimmery granite color polish. It was fabulous! I created a smokey eye with slate and granted colored shadows as the lid and accent shades and contrasted the crease with a warm coppery bronze color. We also used extensions in black to give the picture a dark and mysterious mood.
I loved the way both the looks were executed and shot, and couldn't thank Julie and Courtney enough for the quick and fantastic shoot. These shots will definitely be going into my book. Below are some behind the scenes pictures of the shoot...Well, the first look anyways. My Iphone died sometime between the last picture and my completion of the second look. Enjoy!
.jpg)
.jpg)
.jpg)
Since we were shooting from the shoulders up, our lovely model didn't have to "strip down" and only needed to wear a flesh colored sports bra. Much easier to shop out :)
Below are some key products I used on the shoot. I am so happy to have them in my kit as they produced such stellar results.
Embryolisse 24 hour miracle cream

It truly is a miracle cream. Just a little dab on the 5 points of the face and you (or your model) will have creamy dreamy skin almost immediately. This product has saved my skin on more than one occasion.
Kevyn Aucoin The Sculpting Powder

While this powder looks to be an unusual shade, it is fabulous for creating natural looking shadows/contours. I've had more than one person call me a miracle worker because of this amazing powder.
Face Atelier Lip Glaze In Cameo

I thought I couldn't live without my Peach and Flamingo Lip Glazes from Face Atelier (Well...I can't!) and after the Makeup Show in March, I realize I can't live without Cameo either. This is a perfect shade to create the coveted "nude lip" in light medium to medium deep skin tones. Gorgeous!
Face Atelier Transforming Gel

What do we have here...another product from Face Atelier! It's a great line, what can I say? You might have noticed that gorgeous shade of turquoise on my model's lip. While I would like to say that I am fully equipped with every shade of lipstick known to man, my kit (and my back!) couldn't handle that load. So I do what any makeup artist who wants to really pare down their kit does: Carry this little baby! I actually mixed a Yaby eyeshadow and pearl paint together with the transforming gel and I instantly had a yummy aqua lipstick. Transforming Gel, I love thee!!
Yaby Pearl Paints

These little darlings are the basis of the fantastic range of colors in my kit. With my pearl paint palette, I have any color liner, lipstick, eyeshadow or whatever I may need at my finger tips (paired with my Face Atelier transforming gel of course!) One of my kit staples. Love them!
Stay tuned for some pictures of my last shoot and a behind the scenes from another shoot!
No comments:
Post a Comment